Some of my disks are causing concern due to the computer’s slow performance with them and frequent freezes. One of my old LaCie drives fell off the table while it was running, and the casing cracked. What should I do to preserve the data?
When encountering issues with a hard drive, it is crucial to correctly assess the situation and develop an appropriate action plan for data recovery. This article will cover the key steps for diagnosing and recovering data from a damaged drive, as well as provide recommendations on using specialized software and services.
1. Diagnosing the Problem
The first step is to check for possible hardware issues:
- Check Cables and Ports: Ensure there are no problems with the disk’s power supply, USB cables, USB connectors, or ports on your computer or disk. Try connecting the disk with a different USB cable, to another USB port, or to another computer.
- Check Disk Detection: If the disk does not appear in Computer Management (Windows) or Disk Utility (Mac) after connection, this could indicate a serious problem. In such cases, it’s better to consult a specialist, as DIY solutions might not help.
2. Checking Disk Capacity and Properties
Example:
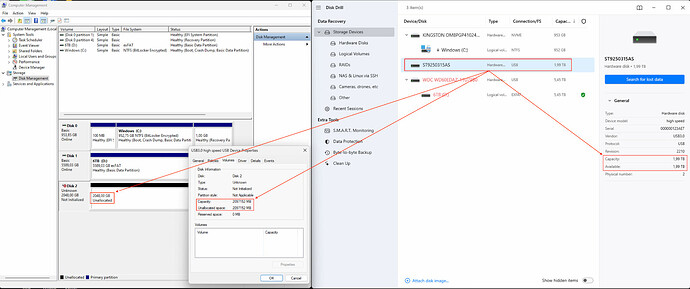
For a problematic Seagate Momentus 5400.6 ST9250315AS disk with a 250GB capacity, in Computer Management on a Windows computer, the disk capacity is displayed as 2TB with the status “Unknown 2048.0Gb, Not Initialized.”
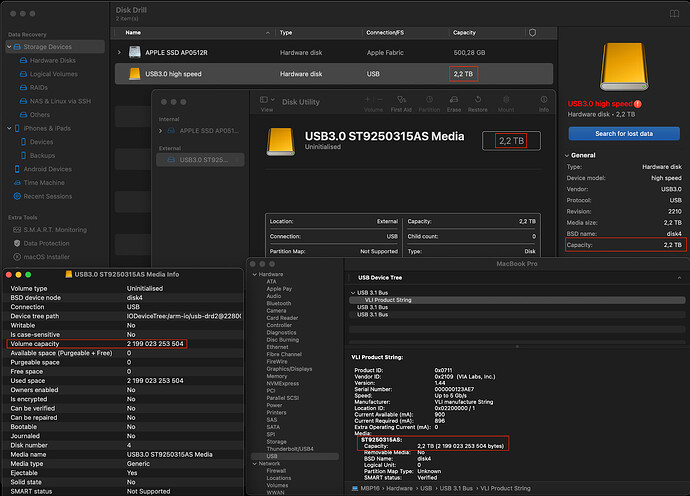
On macOS, this same disk is shown as having a 2.2TB capacity. The difference in sizes is due to the different units used for displaying storage capacities in Windows and macOS.
Cause: This behavior is often due to a corrupted firmware or errors in the disk’s controller. In such cases, DIY solutions are not viable, and you should seek professional help. This issue is well-known in data recovery labs and usually has a high chance of successful data recovery. You can consult specialists at ACE Data Recovery for assistance.
3. External Symptoms of a Damaged Disk
Certain symptoms may indicate mechanical or electronic issues with the HDD:
- Clicking Sounds: Periodic or constant clicking may indicate problems with the read/write heads.
- Grinding Sounds: Grinding or scraping noises can indicate damage to the disk surface or mechanical components.
- Buzzing or Vibrations: Improper motor operation can cause unusual buzzing or vibrations.
- Constant Restarting: The disk may continually attempt to restart, accompanied by the corresponding sounds of powering on and off.
Warning: If you hear such sounds, immediately disconnect the disk. Continuing to use it could result in irreversible data loss.
4. Checking and Interpreting the Disk’s SMART Status
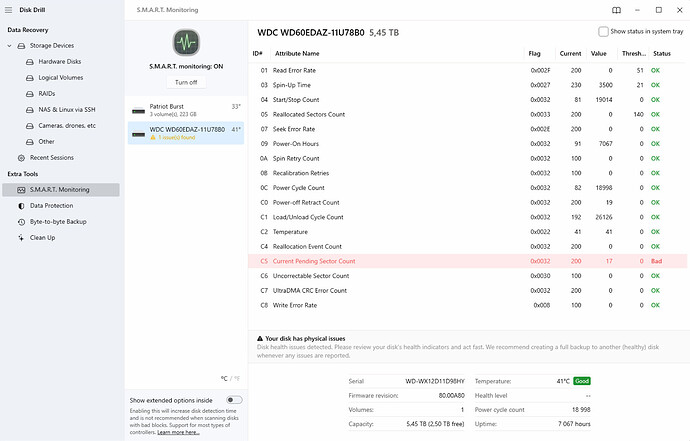
SMART (Self-Monitoring, Analysis, and Reporting Technology) provides information about the health of the hard drive. Let’s consider an example of a disk that has begun to degrade:
- Current Pending Sector Count: The value is 17 sectors marked as “Bad.” This means there are 17 sectors on the disk that have not been successfully read and are awaiting reallocation or recovery. This is a sign that the disk may be on the verge of failure.
- Reallocated Sectors Count: The value is 0, indicating that there have been no reallocated sectors yet. However, given the pending sectors awaiting reallocation, this might change soon.
- Reallocation Event Count: Also shows 0, confirming the absence of reallocated sectors.
5. Creating a Byte-to-Byte Backup of the Disk
This crucial step is recommended whenever data is lost, even if the drive shows no SMART or performance issues.
-
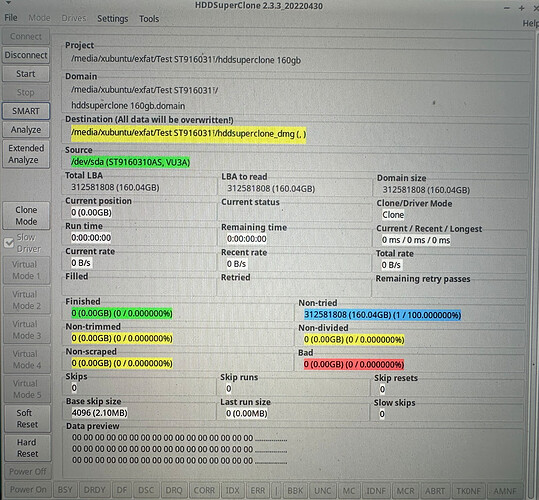
For Linux: Use HDDSuperClone. This software allows you to create images even from heavily damaged disks with minimal interference from the operating system. You can create a bootable disk by writing the ISO image to a USB drive using a tool like Rufus, and boot from it to create a copy of the disk.
-
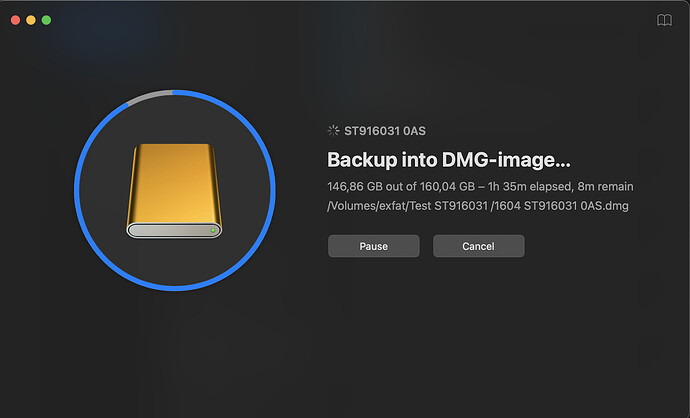
For Windows/macOS: A good option is Disk Drill, which uses low-level access to ioKit, multi-pass reading of areas with bad sectors, and an AI-based analysis strategy that allows you to obtain an accurate disk image even with a large number of bad blocks.
Note: Creating a byte-to-byte backup can take quite a long time and depends on the disk condition and the number of bad blocks. Professional data recovery software uses a multi-pass backup method, in which bad blocks and adjacent areas are skipped at the first stage to speed up the process, and bad sectors are re-scanned at the second stage. This method allows you to speed up the process of obtaining data from disk areas that contain bad blocks and unstable blocks, which will be analyzed by multiple reading at the second stage of the backup. Please note that for some software, multi-pass scanning requires a specialized technical license. If creating a byte-to-byte backup takes a very long time (more than 1 week for a disk up to 5 TB), you may want to contact professionals who, using special hardware systems such as the PC3000), can create an image even from very bad disks.
6. The Main Stage of Data Recovery
Once the original disk has been copied and disconnected from the computer, connect the image to DIY data recovery software and begin scanning. Detailed guidance on using this software can be found in another article.
Tip: Do not rush to delete the byte-to-byte image, as the integrity of the recovered files must be carefully checked:
- Videos: Should play correctly, and fast-forwarding should work.
- Photos: Open them not only in standard Windows/Mac viewers but also in graphic editors, especially if they are professional formats (e.g., Nikon/Sony/Canon RAW). Such files may contain multiple embedded files, whose integrity can only be verified using specialized software.
Conclusion
Recovering data from a damaged disk is a process that requires a careful approach and meticulous execution of each step. If you are unsure of your abilities or do not want to risk data loss, it is better to consult professionals, such as ACE Data Recovery. Regular backups and proper hard drive usage can help prevent many issues in the future.
Additional Resources
- HDDSuperClone — Official Website
- Disk Drill — Official Website
- PC-3000 — Official Website
- ACE Data Recovery — Professional Data Recovery Services
