I can no longer find the folder with the source materials on my Terramaster NAS with two disks. How can I properly locate them?
How to Recover Data from NAS: Complete Recovery Guide
Network Attached Storage (NAS) devices are widely used to store large amounts of data in offices, homes, and businesses. A NAS typically consists of multiple hard drives combined in a RAID (Redundant Array of Independent Disks) configuration to improve performance, resiliency, and data protection. However, even such systems can fail, resulting in data loss. Recovering data from a NAS is a complex process that requires a thorough understanding of both the RAID configuration and the specific features of the NAS system. In this article, we’ll look at the basic steps to recover data from a NAS, as well as the considerations associated with different RAID configurations.
Understanding NAS configurations and their impact on data recovery
Hardware and software RAID on NAS
RAID arrays can be implemented both in hardware and in software.
Hardware RAID are managed by special controllers that perform all data distribution and array management operations independently of the main system. These controllers can be built into the NAS or connected as separate devices. Hardware RAID typically provides high performance and additional features such as caching and backup. However, restoring data from hardware RAID may require special hardware and software, making the process more complex.
Software RAID, on the other hand, are implemented through the operating system or specialized software. They do not require additional hardware, but do place a load on the system processor since all RAID operations are performed in software. Software RAID is flexible and cost-effective, but its performance can be inferior to hardware solutions, especially on heavily loaded systems. Recovering data from software RAID can be less expensive, but requires a thorough understanding of the configuration being used.
Basic RAID levels on NAS
The following RAID types are most often used in NAS systems, each of which has its own data recovery features:
1. RAID 0 (Striping)
-
Description: Data is divided into blocks, which are written simultaneously to several disks, which significantly increases speed.
-
Disadvantages: Data recovery is difficult and requires professional help in the laboratory. If one drive fails, all data is lost as there is no redundancy.
2. RAID 1 (Mirroring)
-
Description: Data is duplicated on two or more disks. If one drive fails, the data remains available on the other.
-
Disadvantages: Data recovery is possible, but requires replacing the failed disk. If multiple disks fail, data recovery may become impossible.
3. RAID 5 (Striping with Parity)
-
Description: Data and parity information are distributed across all disks in the array. Parity is used to recover data when one drive fails.
-
Disadvantages: The data recovery process is complex and can be slow. If more than one drive fails, data recovery is difficult and requires professional lab assistance.
4. RAID 6 (Striping with Double Parity)
-
Description: Similar to RAID 5, but with an additional parity block, which allows you to withstand the failure of two drives.
-
Disadvantages: The complexity and length of the data recovery process. If more than two disks fail, data recovery is difficult and requires professional assistance in the laboratory.
5. RAID 10 (RAID 1+0)
-
Description: Combines RAID 1 and RAID 0. Data is first mirrored and then distributed across multiple disks.
-
Disadvantages: Data recovery is possible, but depends on the nature of the failure. If both disks in one mirror pair fail, data recovery becomes difficult and requires professional assistance in the laboratory.
6. JBOD (Just a Bunch of Disks)
-
Description: Disks are combined into one logical volume without redundancy. Data on each disk is stored independently.
-
Disadvantages: Data recovery can be difficult or impossible and requires professional lab assistance. If one drive fails, the data on it is lost.
Specific RAID types used in NAS from Synology, QNAP, WD and other manufacturers
Some NAS manufacturers offer unique RAID management solutions that require a special approach when recovering data.
7. Synology Hybrid RAID (SHR)
-
Description: SHR allows flexible use of disks of different sizes and automatically optimizes the array for maximum capacity and data protection.
-
Disadvantages: The data recovery process may be slower when using disks of different sizes. This complicates the recovery process and requires additional resources.
8. QNAP RAID (QNAP’s RAID Configurations)
-
Description: QNAP offers advanced RAID management features such as Triple Parity and RAID-DP for added data protection.
-
Disadvantages: Data recovery is resource intensive and time consuming. Such complex configurations can slow down the recovery process and require specialized hardware.
9. Western Digital RAID (WD Red NASware RAID)
-
Description: WD NASware optimizes the performance of WD Red drives in RAID, improving compatibility and reliability.
-
Disadvantages: Limited compatibility and difficulty recovering with non-optimized drives. Recovery problems may occur if non-optimized drives are used.
10. UnRAID
-
Description: UnRAID uses a similar approach to JBOD, but with the ability to add data protection and support for different file systems.
-
Disadvantages: Data recovery can be difficult when using unstructured configurations. Each drive operates independently, which complicates the recovery process.
If your skills and knowledge are insufficient to understand the process or you encounter non-standard RAID configurations, it’s better to consult professionals.
Steps to recover data from NAS
-
Stop all writing to the NAS: As soon as you realize that data has been lost, stop all writing to the NAS immediately. This will prevent your deleted data from being overwritten and will increase your chances of recovering it.
-
Check disk status (SMART): Use built-in utilities or third-party software to check the disk status of the NAS.
-
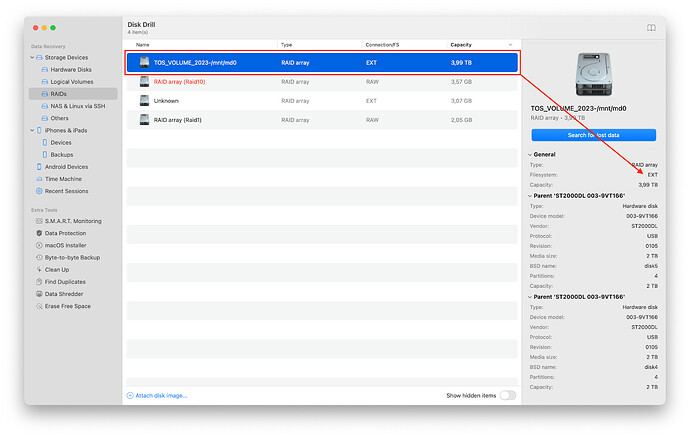
Define RAID Level and File System: Understanding the RAID configuration and file system (e.g. EXT4, NTFS, Btrfs) will help you select the right tools and methods for data recovery.
-
Determine the cause of data loss:
The data has been deleted from the NAS, you no longer see the data on your NAS over the network, NAS disk is not visible over network etc…
There are two recovery options available
Option one: Recovery via SSH
In order to recover data from the NAS over the network, you must enable and configure access to the NAS via SSH.
If your NAS is not listed, look in the documentation and settings for SSH access and remember to disable it or restrict access to it after data recovery is complete to avoid security issues.
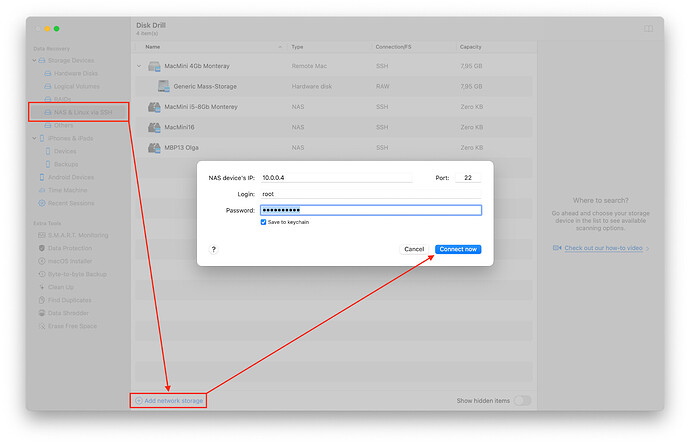
After SSH is enabled, download and run Disk Drill, select the “NAS & Linux via SSH”/’Add network storage” section
In the dialog box, enter the NAS IP address, SSH login (usually root or admin), and the SSH password you specified in the NAS settings. Click “Connect now” and connect to your NAS storage.
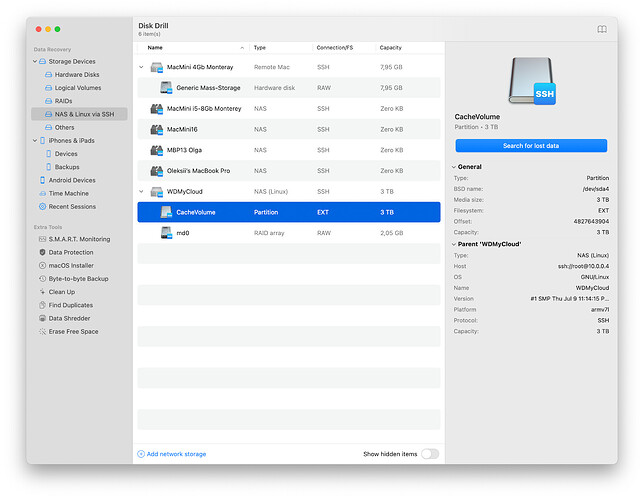
Take a close look at the partitions that are found on your NAS; there may be several system or service partitions, the data from which you most likely do not need. Typically the data section is the largest.
Depending on what data you want to get from the NAS, there are different scanning methods:
Run all recovery methods – run all data scanning methods. The longest one will allow you to find all deleted files, artifacts, damaged and partially damaged files, file systems and directories.
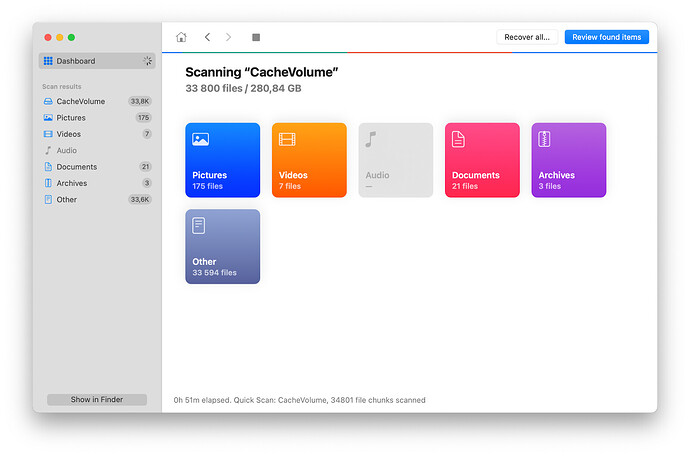
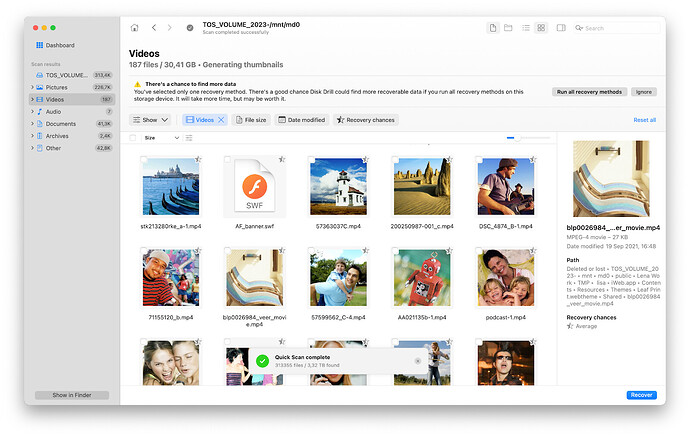
Quick Scan - searches only deleted data and shows existing data on NAS drives. The fastest way to get results in case of searching for deleted data or minor damage to the file system.
Deep Scan is a deep search (carving), which is used when the file system is destroyed or it is impossible to determine it and the search is performed across the entire disk from the first to the last sector.
Scan for lost HFS+ partition – search for lost HFS partitions, for most NAS models (except Time Capsule) will be irrelevant
Allocate existing data – display only existing data on the NAS. Can be useful if you can’t access your data due to permissions errors or minor file system corruption.
I recommend starting by launching Quick Scan - it works the fastest and you may get results already at this stage
Option two: Restoring disks from NAS on a computer
- Turn off the NAS, open the case, number the drives based on their connection sequence in the NAS, take a photo.
- Connect NAS drives to your computer directly via SATA connectors or via a USB docking station
- Check the SMART status of all NAS drives and, if there are drives with a problematic status, make a byte-to-byte backup of the problematic drives (Disk Drill for mac/win, CrystalDiskInfo for win, DriveDx for macOS)
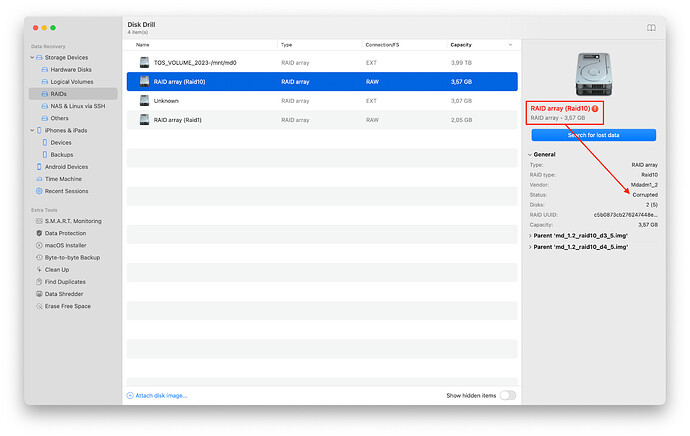
- Run Disk Drill and check that all NAS raid disks are identified and the raid status is Valid or Recovered.
- If the raid status shows Corrupted, I recommend turning to professionals.
- Select the desired partition to scan (there may be several additional system partitions on the NAS, so choose the largest one, usually this is where the necessary data is stored).
- Depending on the type of lost data, run Quick Scan (Right button on the desired section and select in the submenu), or a general scan by clicking on “Search for lost data”
- Wait until the scan is completely finished; some scanning algorithms work at the very end of the scan.
- Analyze the results, pay attention to the chances of recovery and the presence of a preview of the file, restore the necessary files.
Main problems and features of data recovery from NAS
-
Performance: Data recovery can take a long time and require significant computing resources.
-
Compatibility: Not all programs and devices support the same RAID configurations, which may complicate the recovery process.
-
Security: Encrypting data can make recovery much more difficult. Without encryption keys, access to data may not be possible.
Conclusion
Recovering data from a NAS requires a deep understanding of the various RAID levels, encryption methods, and hardware and software considerations. Regardless of the complexity of the situation, the right recovery strategy, including immediately stopping data recording, checking the health of the drives, and using specialized software, greatly increases the chances of successful data recovery. In case of serious problems, it is always better to turn to professionals to minimize the risk of permanent data loss. Regular backups and monitoring the health of your NAS are also key measures to prevent future data loss.
