What should I do if my raid is no longer visible in the finder?
How to Recover Data from RAID: Some useful and some “useless” information so that you understand what problem you have %-)
RAID (Redundant Array of Independent Disks) systems are designed to provide high performance, fault tolerance, and data protection from loss. However, even with these benefits, RAID arrays can fail, resulting in data loss. Recovering data from a RAID array is a complex process that requires understanding the RAID configuration, the type of failure, and appropriate recovery methods. In this article, we will look at the basic steps that will help you recover data from a RAID system, as well as touch on the features of various RAID configurations and the associated problems when recovering data. I recommend reading this and making a decision about attempting data recovery on your own, or consulting with professionals.
Understanding RAID configurations and their impact on data recovery
Hardware and software RAID
RAID arrays can be implemented both in hardware and in software.
-
Hardware RAID are managed by special controllers that handle all data distribution and array control operations independently of the main system. These controllers can be installed as separate cards in servers or integrated into motherboards. Hardware RAID typically offers high performance and additional functionality such as caching and backup. They also reduce the load on the system’s main processor, since all operations are processed at the controller level. However, recovering data from hardware RAID may require specialized hardware and software, which can complicate the process.
-
Software RAID, on the other hand, is implemented through the operating system or specialized software. They do not require additional hardware, but place a heavy load on the system processor since all RAID operations are performed in software. Software RAIDs are flexible and cost-effective, but their performance may be inferior to hardware solutions, especially on heavily loaded systems. Data recovery from software RAID can be more affordable, but requires a thorough understanding of the configuration being used.
General RAID levels:
-
RAID 0 (Striping): Provides high performance by distributing data across multiple disks. However, RAID 0 does not have fault tolerance. If one drive fails, all data will be lost and recovery will be extremely difficult.
-
RAID 1 (Mirroring): Duplicates data across two or more disks, providing fault tolerance. If one drive fails, the data can be recovered from the mirrored drive. Recovery is usually simple, but depends on the extent of the damage.
-
RAID 5 (Striping with Parity): Data is striped across multiple disks with distributed parity information. RAID 5 can survive a single drive failure. However, if one of the disks fails, recovery requires recalculation of parity data, which can be complex and resource-intensive.
-
RAID 6 (Double Parity): Similar to RAID 5, but with an additional parity block to withstand two drive failures. Although RAID 6 provides better fault tolerance, data recovery becomes even more complex and requires more time and computing resources.
-
RAID 10 (1+0): Combines RAID 1 and RAID 0, providing both high performance and fault tolerance. Data recovery in RAID 10 depends on which drives failed. If both drives in a mirrored pair fail, data may be lost.
-
Linear RAID: Data is written sequentially to each drive in the array. Unlike other RAID levels, Linear RAID does not provide fault tolerance, and if one of the drives fails, data recovery may be difficult.
-
JBOD (Just a Bunch Of Disks): In this configuration, each disk operates independently, but they can be combined into a single logical volume. JBOD also does not provide fault tolerance, and if one drive fails, the data stored on it will be lost.
Software RAID from Apple, Linux and Microsoft
In addition to hardware RAID solutions, there are software RAID implementations that are widely used on various platforms. Let’s look at the main software RAID solutions and their features.
Apple RAID (macOS Software RAID):
Apple RAID supports RAID 0, RAID 1, RAID 10, and JBOD configurations. These configurations are often used to combine multiple disks into one logical volume, providing either high performance (RAID 0), fault tolerance (RAID 1, RAID 10), or simply combining disks of different sizes into one logical volume (JBOD). Data recovery can be difficult if errors occur at the HFS+ or APFS file system level. The main difficulties are related to damage to volumes and unavailability of data during failures.
Linux RAID (mdadm):
On Linux systems, the mdadm utility is widely used to manage software RAIDs. Various RAID levels are supported, including RAID 0, RAID 1, RAID 5, RAID 6, RAID 10, JBOD and Linear RAID. Linux RAID is highly flexible and can be configured in a wide range of configurations, including combined and hybrid RAID levels.
- JBOD and Linear RAID: Unlike standard RAID levels, JBOD and Linear RAID combine disks into a single volume without providing fault tolerance. In JBOD, data can be stored on each drive individually, while in Linear RAID, data is written sequentially across all drives. Both methods are often used to maximize storage capacity without considering fault tolerance, making data recovery more difficult if one of the drives fails.
Problems with data recovery in Linux RAID are usually related to corruption of the array metadata or the mdadm utility itself. Recovery may require manual intervention, including rebuilding the array using configuration backups. In some cases, especially when multiple drives fail, you may need to use specialized data recovery tools such as ReclaiMe or R-Studio.
Microsoft Storage Spaces:
Microsoft Storage Spaces is a software RAID solution built into Windows operating systems starting with Windows 8 and Windows Server 2012. It supports various levels of flexibility and fault tolerance, including simple striping (similar to RAID 0), mirroring (similar to RAID 1), and parity (similar to RAID 1). RAID 5). Also supports JBOD configurations and disk pools, combining multiple disks into one logical volume.
- Disk Pools: In Microsoft Storage Spaces, disk pools allow you to combine disks of different sizes and types into a single storage pool. These pools can be configured to use different levels of fault tolerance, including simple mirror, two-level mirror, and triple parity. Recovering data from disk pools can be difficult if metadata is corrupted or multiple disks are lost simultaneously. It is important to consider the specific pool configuration when restoring data, as this can affect the success of the process.
Exotic RAID configurations and their analogues
Today’s storage solutions offer a variety of RAID and RAID configurations that provide varying levels of performance, resiliency, and flexibility. Let’s look at some of them, including configurations that use a combination of SSD and HDD to optimize performance and capacity.
Using SSD as cache for HDD (CacheCade or similar technologies)
Modern RAID controllers can use an SSD as a cache to read and/or write data stored on the HDD. This allows you to significantly speed up access to frequently used data, while the bulk of the data is stored on the HDD. The most frequently accessed data is automatically cached on the SSD, speeding up read and write operations.
Recovery problems: The main difficulty is that the data located in the SSD cache at the time of failure may not be completely written to the HDD. This may result in data loss or the need to recover data from disparate sources. Recovery may require specialized software that can take into account caching features.
Intel Smart Response Technology (SRT)
Intel SRT is a technology that allows you to use a small SSD as cache for an HDD. Although it is not a full-fledged RAID, the technology is similar to the concept of RAID in accelerating work with data on the HDD
through the use of SSD. The most frequently accessed data is cached on the SSD, making processing much faster.
Recovery problems: In the event of a system failure, there may be problems synchronizing data between the SSD and HDD. Data recovery may be difficult if the data in the SSD cache was not flushed to the HDD correctly. In such cases, you may need to use specialized data recovery tools or turn to professionals.
RAID Hybrid (in hybrid storage systems)
Some NAS devices and server platforms support hybrid arrays where SSD and HDD are used simultaneously. This can be implemented through special technologies such as ZFS using SSDs for logs and cache (ZIL and L2ARC). In such systems, the SSD is responsible for caching and write acceleration, and the HDD provides the main data storage, which allows for high performance at a relatively low cost.
Recovery challenges: Data recovery on hybrid systems can become more complex due to the need to recover data from both the SSD and HDD simultaneously. If an SSD fails and critical metadata or cached data on it is lost, this can result in significant delays in recovery and, in some cases, the inability to fully reconstruct the data.
SoftRAID
SoftRAID is a software RAID solution that is native to the macOS platform and provides support for a variety of RAID configurations, including RAID 0, RAID 1, RAID 4, RAID 5, and JBOD. SoftRAID is known for its easy-to-use interface and high performance, especially for creative professionals and studios where speed of data access is critical. SoftRAID also offers advanced disk health monitoring and failure prediction capabilities.
Recovery problems: The main problems with data recovery with SoftRAID are related to its dependence on specific software and configuration. In the event of a RAID failure, data recovery may require the use of original SoftRAID software or similar tools to reconstruct the array. It is important to consider that data recovery without original software may be difficult, especially if the RAID used non-standard configuration parameters.
Encrypting data in RAID arrays
Data encryption in RAID arrays is used to ensure confidentiality and protect data from unauthorized access. Depending on the RAID type, encryption level, and technologies used, different encryption methods may be used. Here are the main types of encryption used in RAID:
1. Hardware-based encryption
Hardware encryption is usually performed by a RAID controller, which has a built-in encryption mechanism. This can apply to all RAID levels (RAID 0, RAID 1, RAID 5, RAID 6, etc.).
Encryption types:
- AES (Advanced Encryption Standard): One of the most common encryption standards used in hardware RAID controllers. AES can use keys of 128, 192 or 256 bits, providing a high level of security.
Advantages:
-
High performance due to the fact that encryption is performed at the hardware level, without loading the system processor.
-
Independence from the operating system and software.
Application: Hardware controllers from Dell, HP and Intel often support hardware encryption using AES.
2. Software-based encryption
Software encryption is used at the operating system level or specialized software to encrypt data before it is written to the RAID array.
Encryption types:
-
LUKS (Linux Unified Key Setup): Used on Linux-based systems to encrypt partitions and disks, including RAID arrays. LUKS typically uses AES for encryption.
-
BitLocker: Microsoft’s encryption tool used on Windows systems can also be used to encrypt data on RAID arrays. BitLocker supports AES with a key length of 128 or 256 bits.
-
VeraCrypt: Open source encryption software that can be used to encrypt RAID arrays. Supports several algorithms including AES, Serpent and Twofish.
-
FileVault: Apple’s encryption tool built into macOS that can be used to encrypt data on system and non-system volumes, including RAID arrays. FileVault uses AES encryption with a key length of 128 or 256 bits.
Advantages:
-
Flexibility in choosing encryption algorithms and their parameters.
-
Possibility of use on various platforms and operating systems.
Usage: LUKS is often used to encrypt data in RAID arrays on Linux servers, BitLocker for RAID arrays on Windows servers, and FileVault on macOS to protect user data.
3. File system level encryption
Some file systems have built-in encryption capabilities that can be applied to RAID arrays.
Encryption types:
-
ZFS Native Encryption: The ZFS file system has native support for AES-based encryption. This encryption can be applied to any data stored on ZFS volumes, including those in RAID-Z arrays.
-
Btrfs Encryption (Planned): Although Btrfs does not yet fully implement encryption, there is a plan to integrate encryption in the future.
Advantages:
- File system level encryption provides flexibility and integration with other features such as snapshots and cloning.
Application: ZFS is widely used in enterprise storage systems where high reliability and security are required.
4. Device-level encryption (Self-encrypting drives, SED)
Some hard drives and SSDs support self-encryption, which encrypts data directly at the device level. These devices can be used in RAID arrays, providing data encryption before being written to disk.
Encryption types:
- AES: Most SEDs use AES to encrypt data using a built-in hardware mechanism.
Advantages:
-
Does not require additional settings at the operating system or controller level.
-
High performance thanks to hardware encryption.
Application: SED drives are often used in enterprise systems and systems where high security is required, including RAID arrays.
Main problems and features of encryption:
-
Performance: Hardware encryption is usually faster than software encryption, since it does not load the central processor. Software encryption can reduce performance, especially with large data sets.
-
Compatibility: Not all RAID controllers or software can support all types of encryption, which may limit the choice of a suitable solution.
-
Security: Encryption keys must be stored in a secure place. If the keys are lost, it will be impossible to restore access to the data.
Data Recovery from RAID: Basic Steps
Optimal computer configuration for restoring raid disks:
WindowsPC: at least 2GB of free RAM for every 1TB of data in the raid, so if your raid was 24 TB, you need to have at least 48GB of free RAM at the start of the scan. To reconstruct raids with a very large number of files and previous active use of the raid, you may need twice the amount of free RAM on your computer. A modern processor and a fast system SSD with at least 500GB of free space.
Apple Mac: at least 1GB of free RAM for every 1TB of raid data + 5GB for system needs. A modern processor and a fast system SSD with at least 250-500GB of free space.
Disk array for saving scan results: depends on the amount of data that needs to be recovered and on the need to make byte-to-byte backups of raid disks.
Optimally, this is the total volume of all raid disks + 1.5-2 volumes of actually occupied data in the raid.
Accordingly, if your raid was 24 TB (For example RAID6:Number of disks: 4 12TB disks for a total of 48 TB (24 TB is parity, 24 TB is usable capacity), then for an effective data recovery strategy you will need a minimum of 48 TB for byte-to-byte backup + 36-48 TB for data recovery. Total ~96TB in the worst case.
Raid scanning speed:
In the absence of physical degradation of the disk, the scanning speed of data recovery programs will vary from half the speed of the slowest disk in the raid to the maximum possible speed of the raid in an ideal case. For example, RAID6 24TB (4x12TB) will be scanned for approximately 60-120 hours in case of a full scan.
-
Stop all writes to the RAID: As soon as you realize that data has been deleted, immediately stop all writes to the RAID array. This will prevent the deleted data from being overwritten, which will significantly increase the chances of its recovery. For most DAS raids or internal raids, this can be done by unmounting the raid volumes from the system or switching them to read-only mode.
-
Check the SMART status of the RAID drives:
Before proceeding with recovery, it is important to check the status of the disks in the array. SMART data can provide important information about the health of each drive and alert you to potential problems.
How to get SMART status for drives in DAS RAID on macOS and Windows
To monitor the status of SMART disks in DAS RAID from various manufacturers, you can use both your own utilities and third-party software. Here’s a quick overview with links to download pages:
-
Promise Technology: Use Promise Utility to manage and monitor RAID on macOS and Windows.
-
G-Technology (SanDisk Professional): To configure and manage RAID, you can use G-RAID with Thunderbolt Configurator. To monitor SMART on macOS use Disk Drill or DriveDx, and on Windows use Disk Drill or CrystalDiskInfo.
-
LaCie: To control and view SMART data, use LaCie RAID Manager.
-
Drobo: Management and monitoring are available via Drobo Dashboard.
-
OWC (Other World Computing): Use SoftRAID for RAID management and SMART monitoring.
-
TerraMaster: The TNAS PC/Mac program provides access to SMART data.
-
Areca: Areca RAID Manager is available for monitoring and managing RAID controllers.
-
HighPoint: Management and monitoring is possible via HighPoint WebGUI or [HighPoint RAID Management](https://www .highpoint-tech.com/USA_new/series-rm.html).
-
Buffalo Technology: Use NAS Navigator to monitor and manage devices.
Recommendations:
If the built-in utilities do not provide access to SMART data, use third-party solutions such as Disk Drill or DriveDx on macOS and Disk Drill or CrystalDiskInfo on Windows.
-
Define RAID Level and File System: Determine the RAID level (eg RAID 0, RAID 5, RAID 6) and the file system to use (eg EXT4, NTFS, Btrfs). This will help you choose the right tools and methods for data recovery.
-
Use specialized data recovery software:
-
Disk Drill: Powerful software that supports various RAID configurations and file systems. Disk Drill can recover deleted files and also helps reconstruct damaged RAID arrays.
-
R-Studio and ReclaiMe: These programs also support RAID data recovery and can handle more complex cases, including situations where you need to manually specify RAID parameters.
Professional data recovery software should see and collect your raid, show the correct name of the raid volumes, their size and the data on it.
5. Defining a recovery strategy
a) you deleted files on the raid, this is the simplest option - perform a quick scan and analyze the results. Usually a quick scan will give you your deleted data in the search results. If the results do not contain the files you need, perform a full scan. During a full scan, the results may contain duplicates and files found using the deep scan method with arbitrary names like filexxxx.jpg
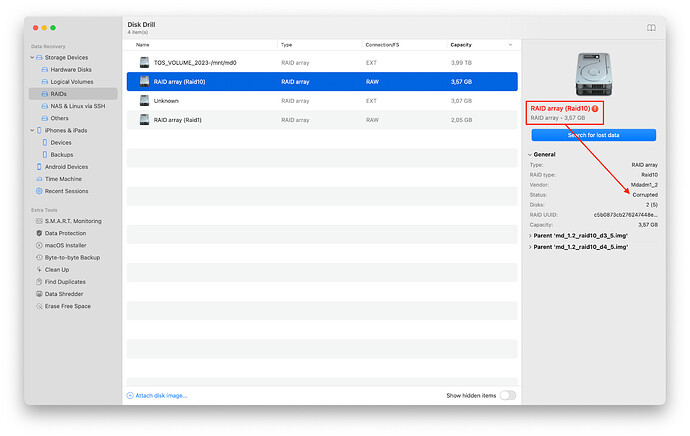
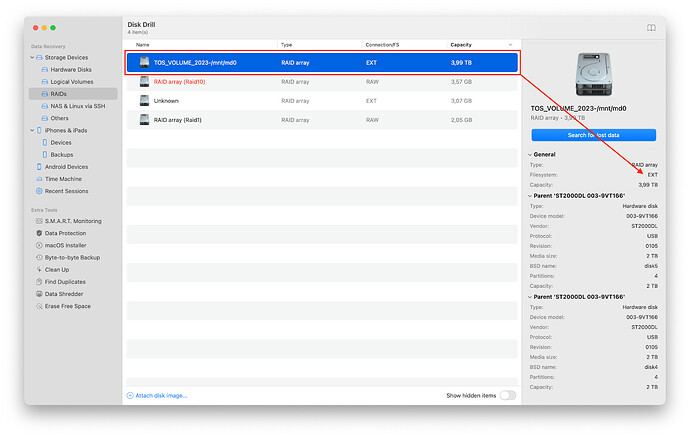
b) the raid volume is damaged and the system does not show it, it shows it as separate parts of the raid. Run the data recovery software and check that the raid was compiled correctly and has a valid or recovered status.
Corrupted raid sample, DIY data recovery will be problematic or impossible, please seek professional help:
Sample raid valid or recovered, DIY recovery is possible and has a high chance:
The volume size is determined correctly, the file system is determined, you can start scanning.
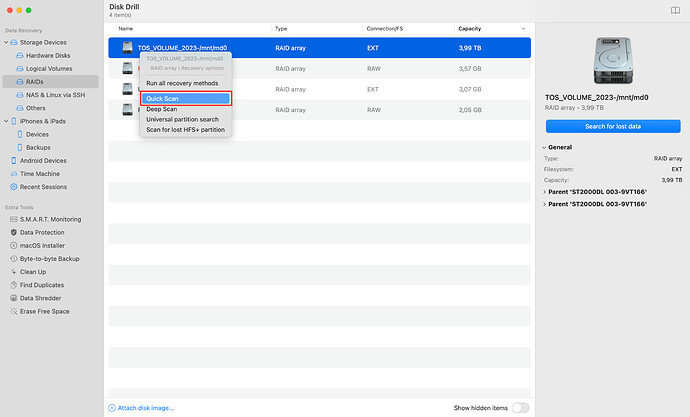
Right-click on the desired disk partition and select “Quick Scan”, this scanning method allows you to quickly find existing data and data that has been deleted by the user.
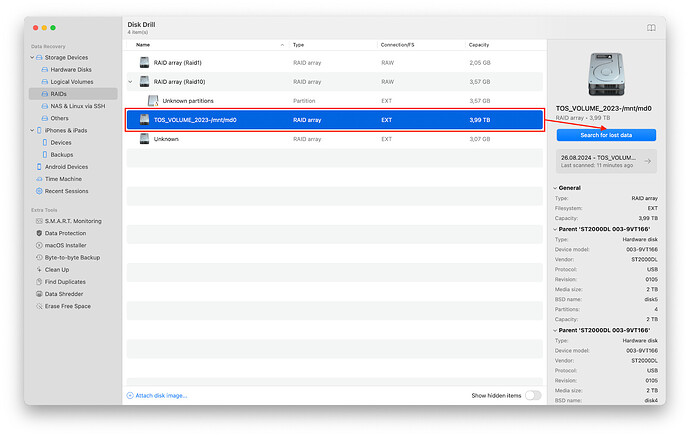
If Quick Scan does not find all your data, you need to run a full scan. The main reason that not all data is found during a quick scan is damage to the raid file system structure:
This process will take significantly longer as all parts of the raid will be fully scanned, but the results will contain significantly more data.
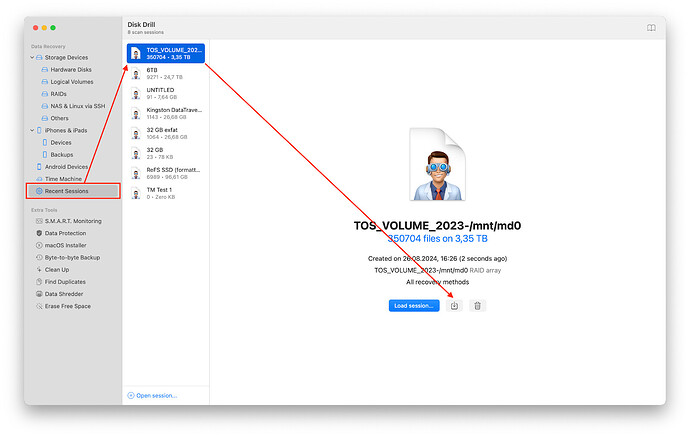
- Data Recovery: After successfully scanning and reconstructing the RAID array, the program should provide a list of detected files. Select the files you want and save them to a separate storage device (not the same RAID array). Analyze the results and save the scan session file, this will allow you to return to the scan results at any time without having to repeat a multi-hour scan.
Main problems and features of data recovery from RAID
-
Performance: Data recovery can be time-consuming and computationally intensive, especially with complex RAID configurations.
-
Compatibility: Not all programs and devices support the same RAID configurations, which may complicate the recovery process.
-
Security: Encryption can make data recovery significantly more difficult. Without encryption keys, access to data may not be possible.
Conclusion
Recovering data from RAID arrays is a complex task that requires a deep understanding of various RAID levels, encryption methods, and the specifics of working with software and hardware solutions. Regardless of the complexity of the situation, following the correct recovery strategy, including immediately stopping writes to the array, checking the health of the disks, and using specialized software, significantly increases the chances of successful data recovery. It is important to remember that each situation is unique and requires an individual approach. In case of serious problems or doubts, it is always better to seek professional help to minimize the risk of permanent data loss. Timely backups and regular monitoring of the status of RAID arrays are also key measures to prevent potential data loss in the future.
