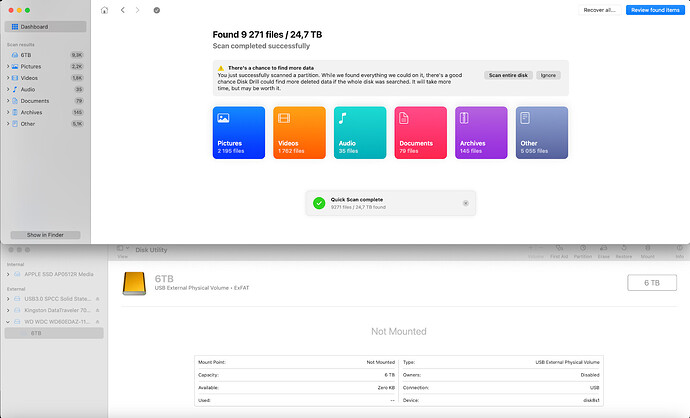
Yesterday I was still working on my project, and today the FinalCut does not find the original videos :-/
First of all, you should evaluate and think about the reasons for data loss, the main ones being the following:
- Accidental or intentional deletion of data by the user or as a result of program failure
- File system failure, file allocation data table, logs
- Hardware problems with the disk that resulted in a file system failure or the operating system being unable to read data
Stop using the drive where you lost data
As soon as you realize that data has been lost, you must quickly block the disk for recording. Continued use of the drive or device may overwrite lost data as the system continues to write to the internal or external drive almost constantly. If it is an external drive, unmount the data partition or set it to read only mode to prevent further manipulation of the data.
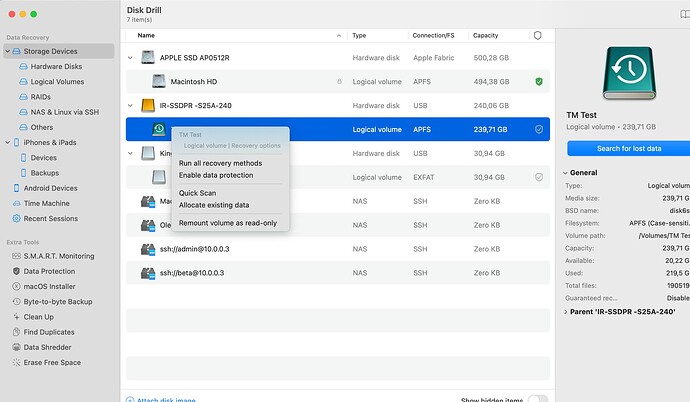
Use Disk Drill to switch the partition from which you deleted data to read-only mode. To do this, right-click on the section name and select Remount as Read-Only.
If data is lost on the startup disk, immediately turn off the computer and continue to work only from the system from an external drive, or remove the computer’s internal drive and connect it to another computer, if possible.
Assess the severity of your data loss
Not all data loss cases are created equal. Some may be as simple as recovering files from the recycle bin, while others may involve complex hardware failures that you have no chance of resolving on your own and will need to call a professional to resolve. The chances of data recovery also depend on the type of storage device, where the loss occurred, as well as the actions taken after the loss. Let’s look at the main types of drives and factors influencing the success of data recovery.
Disks with SMR technology: volumes and form factors, why recovery from such disks can be a problem even for professionals.
SMR (Shingled Magnetic Recording) is a recording technology used to increase data density on hard drives. However, it has its own characteristics, such as slower data recording and difficulties in recovering from data corruption. SMR drives are most often used in the following cases:
-
Capacity: SMR is most often found in drives ranging from 1 TB to 8 TB. These drives are aimed at the segment that requires high capacity at an affordable price.
-
Form Factor: SMR drives are typically available in the 3.5-inch form factor, which is widely used in desktop computers, as well as some 2.5-inch drives, which are used in laptops and external drives.
-
Device types: SMR drives are often used in low-cost hard drive models for storing archival data, backups, and in NAS (network-attached storage) for home and small offices. For example, series such as Seagate BarraCuda, Western Digital Blue and Toshiba P300 may include models with SMR.
TRIM on different file systems or another killer of your data that is difficult to stop
Detailed description of the TRIM command:
- Purpose of TRIM:
- The TRIM command is designed to optimize the operation of SSDs and SMR HDDs. Unlike traditional hard drives (CMR HDDs), SSDs use memory cells that can wear out with repeated cycles of writing and deleting data. Therefore, it is important to minimize the number of unnecessary writes and erases to extend the life of the device.
- How TRIM works:
- When the operating system deletes a file, it usually simply marks it as deleted, without erasing the data from the disk itself. This is done to speed up the system. However, on an SSD this can cause a problem, since without the TRIM command the device will not know which data blocks are truly not needed and may continue to consider them busy. For SMR HDD the behavior is identical.
- The TRIM command tells the SSD that certain blocks of data are no longer in use and can be cleared or prepared for rewrite. The SSD/SMR HDD can clear these blocks in its free time, thus optimizing its performance.
- Benefits of TRIM:
- Acceleration of data recording: When an SSD/SMR HDD knows which blocks can be written, the data writing process is faster because the drive does not waste time erasing blocks before writing. For SMR HDDs this is especially critical due to the peculiarities of the recording technology of these discs.
- Extending SSD life: The number of write and delete operations is reduced, which reduces wear on memory cells.
- Reduced fragmentation: SSDs can manage data better, which reduces fragmentation and maintains high performance.
- Impact on deleted data:
- When TRIM is executed, data at the file system level is marked as deleted. If the SSD supports TRIM and the command is executed, the data in these blocks is considered erased and can be overwritten. This means that it becomes extremely difficult or impossible to recover data after TRIM is performed, since the data is actually deleted at the physical media level.
- For the user, this means that after executing the TRIM command, it will not be possible to recover data from the recycle bin or through recovery programs, since the data blocks have already been cleared and prepared for a new write.
Under Windows and macOS, TRIM affects data recovery differently depending on the file system used:
Windows:
- NTFS: TRIM actively deletes data when files are deleted, making their recovery nearly impossible if TRIM is enabled. This is because NTFS sends TRIM commands immediately after deleting a file, informing the SSD that the data may be overwritten.
TRIM Execution Time: The TRIM command typically executes almost immediately after deleting data. However, in cases of high system load or at system startup, TRIM execution may be delayed.
Note: When formatting a disk to any file system under Windows, the system can send a TRIM command to the disk controller, regardless of which file system the disk is formatted to. This may result in the deletion of data that could have been recovered before formatting.
-
exFAT: TRIM does not apply to exFAT. This means that deleted data on exFAT drives can potentially be recovered if it has not been overwritten.
-
FAT32: As with exFAT, the TRIM command is not supported on the FAT32 file system. It is one of the oldest file systems used primarily on removable media. Deleted files on FAT32 can be recovered if they were not overwritten because TRIM is not performed.
-
ReFS (Resilient File System): TRIM is supported in ReFS and deleted files, like in NTFS, may become unrecoverable after executing the TRIM command. ReFS is used primarily in server and enterprise environments to provide high reliability and performance.
Important: Some OEMs may disable TRIM support when installing Windows at the factory. In some cases, Windows itself may incorrectly recognize the SSD as a regular hard drive, which can affect performance, system behavior, and chances of recovering deleted data.
How to check TRIM status on Windows:
How to check TRIM status on Windows:
-
Open a command prompt with administrator rights.
-
Enter the command:
fsutil behavior query DisableDeleteNotify. -
If the result is
0, TRIM is enabled. If the result is1, TRIM is disabled.
macOS:
- APFS (Apple File System): In APFS, TRIM plays an important role in SSD management. When files are deleted, the data quickly becomes unrecoverable because TRIM frees up disk space, making recovery nearly impossible.
TRIM Execution Time: TRIM on APFS also executes almost instantly, but may experience delays when the system load is high.
-
HFS+: TRIM is also supported on SSDs with the HFS+ file system, but the impact may be slightly less aggressive than with APFS. However, data recovery becomes significantly more difficult if TRIM is enabled.
-
ExFAT: TRIM is not supported on exFAT, which allows you to have a better chance of recovering deleted data if it has not been overwritten.
-
FAT: As on Windows, TRIM is not supported on FAT file systems (including FAT32) on macOS. This means that deleted data on FAT drives under macOS can be recovered if it has not been overwritten, since the TRIM command is not used.
Features of TRIM on macOS:
TRIM is enabled by default only for internal Apple SSDs and some external SSDs connected via Thunderbolt. Most external SSDs connected via USB, as well as external SMR HDDs, do not support TRIM. This means that if you have an external USB SSD, TRIM will likely not be enabled, increasing the chances of data recovery since it will not be immediately deleted at the disk controller level.
Impact of SMART on the likelihood of data recovery
SMART (Self-Monitoring, Analysis, and Reporting Technology) is a health monitoring system for hard drives and SSDs that helps predict possible drive failures. Based on SMART data, you can assess the condition of the disk and the likelihood of successful data recovery. Here’s how key SMART parameters affect the recovery process:
-
Reallocated Sectors Count (05): This parameter shows the number of sectors that were reallocated due to read or write errors. A high value for this parameter indicates possible problems with the disk surface, which can complicate data recovery, especially if failures continue.
-
Current Pending Sector Count (197): This parameter tracks the number of sectors that cannot be read and are awaiting reallocation. If such sectors are present on the disk, data recovery may become more difficult because they indicate areas where data is potentially lost.
-
Uncorrectable Sector Count (198): This parameter shows the number of sectors that cannot be recovered when attempting to read. The presence of bad sectors significantly reduces the chances of successful data recovery, since the data may be lost forever.
-
Seek Error Rate (07): This parameter measures the rate of errors that occur when the disk tries to find certain data. A high error rate may indicate problems with the drive’s mechanics or head positioning, which can complicate the repair process.
-
Power-On Hours (09): This parameter displays the total time the drive has been powered on. A high number of operating hours may indicate an aging drive, which increases the likelihood of failures and reduces the chances of successful data recovery.
Using tools for diagnosing SMART data, such as Disk Drill, CrystalDiskInfo, DriveDX, allows you to quickly assess the condition of the disk. If SMART indicators indicate problems, it is recommended that you back up your data as quickly as possible and restore it before the drive fails permanently.
So, if, based on the data you have read, you see that there is a chance of data recovery, and the condition of the SMART disk allows it to be used, you can proceed with DIY data recovery.
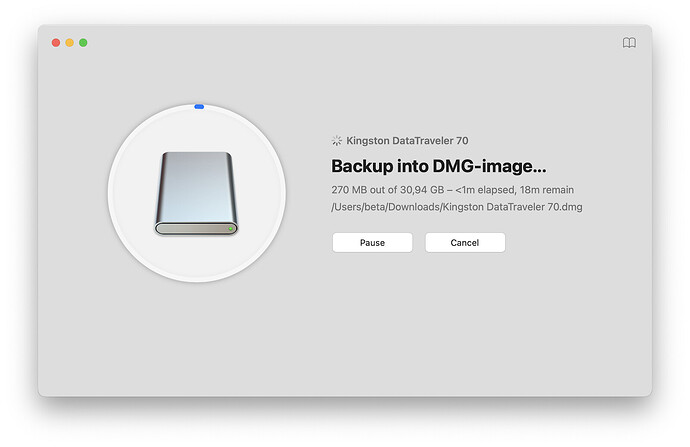
A good step would be to create a byte-to-byte backup image from the disk on which you lost data. This will give you two advantages - an exact copy of the data in a read-only file, which you can work with without fear of losing or overwriting the original disk, and protection from possible errors by a user who has never encountered a similar situation.
And finally, the final step will be to scan the image or DIY disk with data recovery programs; for Mac/Win, the best option would be Disk Drill, as it knows the maximum number of file signatures, which are very important when searching for lost files on a disk. You can use several programs to compare results, most of them will show you previews of the files found and have free options for recovering a certain number of files.


